Configure SharePoint 2016 on-premises to deploy the SPFx web part
Follow the steps to configure SharePoint 2016 on-premises to deploy the SPFx web
part
1. SharePoint 2016
requires Feature Pack 2 to deploy SPFx package. So Feature pack 2 is available
in SharePoint 2017 CU update as mentioned in below URL.
1.
Download and install both language independent and dependent packs available in
the below URL.
2.
It is recommended to restart the server once installation completes, (Whenever
you install the updates, the core SharePoint services stoped. So sometimes the
services may not be started again after the installation)
3.
Run product configuration wizard.
4.
Restart the server once wizard completes.
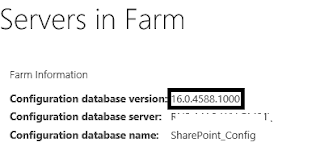
Make sure the database version is as shown in the below image, you can verify the DB version under "Servers in Farm" option in Central Administration.
2. Configure APP
Domain and Prefix for app deployment
In order to configure the App domain and prefix.You
need to create a Subscription Service. If the server is not available with
Subscription, use below script to create Subscription Service.
$account =Get-SPManagedAccount
WT\avaadmin
$appPool =
New-SPServiceApplicationPool -Name SubscriptionServiceAppPool -Account $account
$serviceApp =
New-SPSubscriptionSettingsServiceApplication -ApplicationPool $appPool -name
“Subscription Settings Service Application” -DatabaseName
“SP2016DEV-SubscriptionSettingsDB”
$serviceAppProxy =
New-SPSubscriptionSettingsServiceApplicationProxy -ServiceApplication
$serviceApp
3. Configure APP
Domain and Prefix
Goto
Central Administration --> Apps--> Configure URLs (You can set any
name for domain and prefix)
4. Manage App Catalog
Create a new app catalog site if already not existing for the selected web application.
Goto
Central Administration--> Apps--> Manage App Catalog


Comments
Post a Comment